
Contents
はじめに
@wordpress/scripts のバージョン26.13.0で、Playwright がサポートされました。そこでこの記事では、ブロック開発における Playwright を使用した簡単な e2e テストの導入方法をご紹介します。
注意事項
この記事は、@wordpress/scripts のバージョン26.16.0で検証しています。バージョンが26.13.0~26.15.0の場合は、「(補足) コンフィグファイルの準備」セクションをご覧ください。
ブロックの雛形を作る
@wordpress/create-block を使って、ブロックを一つ持つプラグインの雛形を作成します。ついでにローカル環境も立ち上げられるように、--wp-env オプションを追加しておきます。
npx @wordpress/create-block playwright-test --wp-envローカル環境を起動
npm run env startとりあえず、ブロックを挿入出来る事を確認します。

デフォルトでは決まったテキストしか表示されないので、中のテキストを編集可能な仕様に変更します。
{
    ...
	"attributes": {
		"content": {
			"type": "string",
			"source": "html",
			"selector": "p"
		}
	},
    ...
}
import {
RichText,
useBlockProps,
} from '@wordpress/block-editor';
export default function Edit( { attributes, setAttributes } ) {
const { content } = attributes;
return (
<RichText
tagName="p"
{ ...useBlockProps() }
value={ content }
onChange={ ( newContent ) =>
setAttributes( { content: newContent } )
}
/>
);
}import { RichText, useBlockProps } from '@wordpress/block-editor';
export default function save( { attributes } ) {
const { content } = attributes;
return (
<p { ...useBlockProps.save() }>
<RichText.Content value={ content } />
</p>
);
}あらためてビルドしてみます。これで、挿入したブロックのテキストが編集・保存可能になっているはずです。
npm run buildPlaywright の準備
最新の @wordpress/scripts をインストールしている時点で必要なライブラリは依存関係に入っているので、特に新しく npm パッケージを入れる必要はありません。
$ npm ls @playwright/test
[email protected] /home/username/projects/playwright-test
└─┬ @wordpress/[email protected]
  ├── @playwright/[email protected]
  └─┬ @wordpress/[email protected]
    └── @playwright/[email protected] deduped
$ npm ls @wordpress/e2e-test-utils-playwright
[email protected] /home/wildworks/projects/playwright-test
└─┬ @wordpress/[email protected]
└── @wordpress/[email protected]e2e テストを実行するためのスクリプトを登録
{
	...
    "scripts": {
		"test:e2e": "wp-scripts test-playwright",
		"test:e2e:debug": "wp-scripts test-playwright --debug"
    }
    ...
}
@wordpress/scripts は Playwright 用のデフォルトのコンフィグファイルを持っているため、e2e テストを実行するための準備はこれで完了です。
注: @wordpress/scripts のバージョンが26.13.0~26.15.0の場合は、「(補足) コンフィグファイルの準備」セクションをご覧ください。
テストファイルはまだないですが、一旦ここで Playwright による e2e テストを実行してみます。
npm run test:e2e

> [email protected] test:e2e
> wp-scripts test-playwright

Error: No tests found
テストが見つからないよというメッセージは出ましたが、とりあえずエラーなく動作する事は確認出来ました。
ここでは、デフォルトのコンフィグファイルの上書きを試してみるために、テストで参照するディレクトリをデフォルトの specs から tests/e2e ディレクトリをに変更してみます。
import { defineConfig } from '@playwright/test';

const baseConfig = require( '@wordpress/scripts/config/playwright.config.js' );

const config = defineConfig( {
	...baseConfig,
	testDir: './tests/e2e',
} );

export default config;
テストを書く
実際に簡単なテストを書いてみます。まずは、カスタムブロックがちゃんとエラーなく挿入されることを確認しています。
import { test, expect } from '@wordpress/e2e-test-utils-playwright';

test.describe( 'Block', () => {
	test.beforeEach( async ( { admin } ) => {
		// それぞれのテストの前に新しい投稿を作成する
		await admin.createNewPost();
	} );

	test( 'should be created', async ( { editor } ) => {
		// ブロックを挿入する
		await editor.insertBlock( { name: 'create-block/playwright-test' } );
		// 投稿コンテンツがスナップショットと一致する事をテストする
		expect( await editor.getEditedPostContent() ).toMatchSnapshot();
	} );
} );
e2e テストを実行します。
npm run test:e2eはじめて実行した時はスナップショットがないので、以下のようなエラーが表示され失敗するはずです。
Error: A snapshot doesn't exist at /home/username/projects/playwright-test/tests/e2e/__snapshots__/Block-should-be-created-1-chromium.txt, writing actual.代わりに、以下の内容でスナップショットが作成されます。このスナップショットはカスタムブロックがちゃんと挿入された事をあらわしているので、期待したスナップショットです。
tests/e2e/__snapshots__/Block-should-be-created-1-chromium.txt
<!-- wp:create-block/playwright-test -->
<p class="wp-block-create-block-playwright-test"></p>
<!-- /wp:create-block/playwright-test -->
もう一度 e2e テストを実行します。
npm run test:e2e今度はテストが成功するはずです。
$ npm run test:e2e

> [email protected] test:e2e
> wp-scripts test-playwright


Running 1 test using 1 worker

  ✓  1 [chromium] › test.spec.js:9:6 › Block › should be created (2.2s)

  1 passed (3.1s)
テストをデバッグする
デバッグモードでテストを実行してみます。これは複雑なテストを書く時に、期待した通りに操作が行われているかをトレースする時に便利だと思います。
npm run test:e2e:debug以下のように、二つのウィンドウが立ち上がるはずです。小さいほうのウィンドウのステップオーバーボタンを一度クリックしてください。
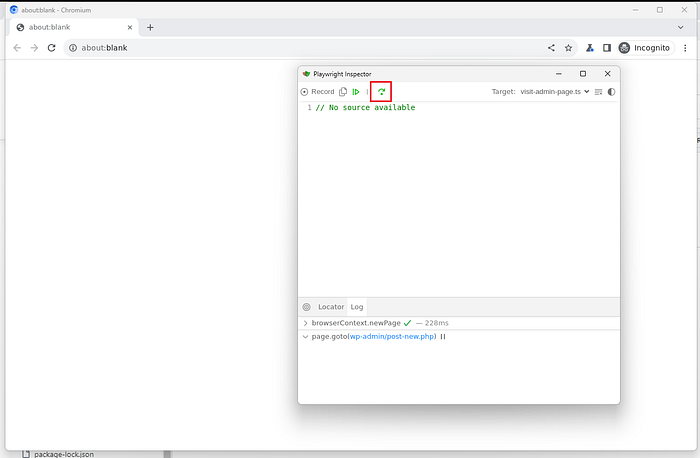
ステップオーバーボタンを押す度に、期待通りにテスト手順が実行されるのが分かります。
新しいテストを書く
今回のカスタムブロックは、中のテキストを編集可能な仕様に変更しているので、「変更したテキストが正しく反映されているか」を確認するためのテストを書いてみます。
test.describe( 'Block', () => {
	// ...

	test( 'should be updated the content', async ( { editor, page } ) => {
		// ブロックを挿入する
		await editor.insertBlock( { name: 'create-block/playwright-test' } );
		// ブロックの中のテキストを更新する
		await page.keyboard.type( 'Hello World!' );
		// 投稿コンテンツがスナップショットと一致する事をテストする
		expect( await editor.getEditedPostContent() ).toMatchSnapshot();
	} );
} );
二つ目の新しいテストが失敗してスナップショット作成されますが、期待したスナップショットであるはずです。
<!-- wp:create-block/playwright-test -->
<p class="wp-block-create-block-playwright-test">Hello World!</p>
<!-- /wp:create-block/playwright-test -->
終わりに
@wordpres/scripts が Playwright をサポートした事で、ブロック開発においてこれまでより簡単に e2e テストを行えるようになったと思います。また、 @wordpress/e2e-test-utils-playwright は便利なユーティリティを多数持っています。具体的な使用例は、Gutenberg プロジェクトの e2e テストを見てみると良いと思います。
(補足) コンフィグファイルの準備
ハンドブックによると、「Playwright を起動するための最適な構成を自動的に検出する」とありますが、この issue で報告されている通り、@wordpress/scripts のバージョンによっては明示的にコンフィグファイルを用意する必要があります。この問題を解決するプルリクエストは既にマージされていますが、このプルリクエストは @wordpress/scripts のバージョン26.16.0の一部であるため、バージョンが26.13.0~26.15.0の場合は、以下のようなコンフィグファイルを定義する必要があります。
@wordpress/scripts のデフォルトコンフィグを踏襲しつつ、動作させるために globalSetup プロパティを上書きします。テストで参照するディレクトリも変更しています。
import { defineConfig } from '@playwright/test';

const baseConfig = require( '@wordpress/scripts/config/playwright.config.js' );

const config = defineConfig( {
	...baseConfig,
	globalSetup: require.resolve( './tests/e2e/global-setup.js' ),
	testDir: './tests/e2e',
} );

export default config;
globalSetup プロパティで指定しているファイルを用意し、以下のように記述します。このコードは、WordPress コアでも定義されている global-setup.js を参考にしています。
const { request } = require( '@playwright/test' );
const { RequestUtils } = require( '@wordpress/e2e-test-utils-playwright' );

async function globalSetup( config ) {
	const { storageState, baseURL } = config.projects[ 0 ].use;
	const storageStatePath =
		typeof storageState === 'string' ? storageState : undefined;

	const requestContext = await request.newContext( {
		baseURL,
	} );

	const requestUtils = new RequestUtils( requestContext, {
		storageStatePath,
	} );

	// Authenticate and save the storageState to disk.
	await requestUtils.setupRest();

	// Reset the test environment before running the tests.
	await Promise.all( [
		requestUtils.activateTheme( 'twentytwentyone' ),
		requestUtils.deleteAllPosts(),
		requestUtils.deleteAllBlocks(),
		requestUtils.resetPreferences(),
	] );

	await requestContext.dispose();
}

export default globalSetup;
コメントを残す