Contents
In this article, I would like to explain how to introduce ESLint to improve the quality of JavaScript code and standardize coding style in WordPress block development.
Why ESLint?
No matter how many spaces there are before and after the brackets, where you break lines, or what variable names you use, as long as the code is all correct, the block will work correctly. No warnings or errors will be displayed in the browser console. If you are the only one who will read the code and you have not exposed it anywhere, that may not be a problem.
However, if you expose the plugin on GitHub or somewhere else, someone may become interested in the plugin, read the code, or write code and submit a pull request. Also, if multiple developers are involved in one block, you will see code written by developers other than yourself.
How would you feel if the coding rules were not unified in such a situation? It may be difficult to read, and it may cause bugs to be introduced.
Create a Block Template
Before explaining about ESLint, let’s first create a template for blocks. You can create each file by yourself, but there is a convenient library called @wordpress/create-block, so we will use it to create a template:
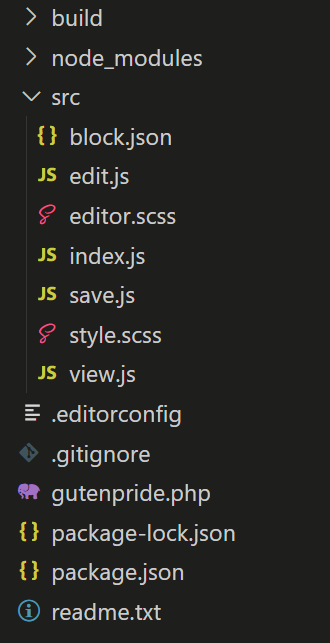
npx @wordpress/create-block gutenprideIf you open the directory called gutenpride, it should consist of the following files:

EditorConfig
Looking at the file structure, we can see that there is a file called .editorconfig. Before introducing ESLint, I would like to explain EditorConfig, which is another important setting for unifying coding style.
As one reason for introducing EditorConfig, I would like to give the following example:
- Multiple developers are involved in one plugin.
- Developer A has set the indentation to two half-width spaces in the default settings of his code editor.
- Developer B has set the indentation to tabs in the default settings of his code editor, with an indentation width of four characters.
Suppose Developer A wrote the following code. Note that all the indentations are spaces.

Developer B opens the file with this code in his or her code editor, removes the indentation of 34 lines, and then visually rearranges the indentation so that it is correct.

However, if Developer A reopens the file, he or she sees that the indentation on line 34 is visually incorrect.

Some code editors may automatically detect the indentation of a file, but it is not guaranteed that the indentation will be visually consistent between all developers.
One reason to introduce EditorConfig is to prevent such differences and unify coding style within a project.
EditorConfig is supported by a large number of code editors. For some code editors, you may need to install a plugin. Check the following page to see if your code editor requires an additional plugin:
EditorConfig for create-block
Now let’s take a look at the .editorconfig settings created by create-block.
# This file is for unifying the coding style for different editors and IDEs
# editorconfig.org

# WordPress Coding Standards
# https://make.wordpress.org/core/handbook/coding-standards/

root = true

[*]
charset = utf-8
end_of_line = lf
insert_final_newline = true
trim_trailing_whitespace = true
indent_style = tab

[*.{yml,yaml}]
indent_style = space
indent_size = 2
Looking at the settings in this file, for example, we can see that the indentation rule mentioned above is set to “tab indent.” You can customize these rules to your liking, but the important thing is whether the coding style is consistent across the entire project based on the rules.
I strongly recommend that you define rules using EditorConfig before introducing ESLint.
Check JavaScript Code with ESlint
Returning to the topic of ESLint, let’s say you update the Edit component of a block to store the text the block displays in the my_variable variable.
export default function Edit() {
	const my_variable = __( 'Gutenpride – hello from the editor!', 'gutenpride' );
	return (
		<p { ...useBlockProps() }>
			{ my_variable }
		</p>
	);
}
If you create a template block using create-block, a mechanism for analyzing such code using ESLint is included by default. Let’s try running the lint:js script defined in the scripts field of package.json.
npm run lint:jsWhen you run this script, you should see an error similar to the following:

This error tells us that the code does not follow two rules:
- The variable name
my_variableis not in camel case - Line breaks and indentation are not correct
Fix Lint Errors Automatically
So, to fix these errors, do we have to fix them all manually and run lint:js over and over again until the errors are fixed?
Like lint:js, create-block has the format script to fix these errors to some extent automatically.
$ npm run format

> [email protected] format
> wp-scripts format

package-lock.json 129ms
package.json 1ms
src/block.json 5ms
src/edit.js 10ms
src/index.js 3ms
src/save.js 2ms
src/view.js 2ms
When you run this command, one of the two errors that was warned about, “errors related to line breaks and indentation,” will be automatically corrected.
export default function Edit() {
	const my_variable = __(
		'Gutenpride – hello from the editor!',
		'gutenpride'
	);
	return <p { ...useBlockProps() }>{ my_variable }</p>;
}
Fix Lint Errors Manually
However, errors in variable names are not automatically fixed. The format command does not automatically fix all errors, so you must manually fix any remaining errors. Change the variable name to camel case (myVariable) as follows:
export default function Edit() {
	const myVariable = __(
		'Gutenpride – hello from the editor!',
		'gutenpride'
	);
	return <p { ...useBlockProps() }>{ myVariable }</p>;
}
If you run npm run lint:js you should be able to confirm that all errors have been resolved.
Where are These ESLint Rules Defined?
Why is my code being analyzed based on certain rules even though I haven’t defined any ESLint rules myself?
When a file template is created with create-block, a library called @wordpress/scripts is installed by default, and ESLint rules are defined in a library that this library depends on. That library is @wordpress/eslint-plugin.
Using the npm ls command, you can see that @wordpress/scripts depends on @wordpress/eslint-plugin.
$ npm ls @wordpress/eslint-plugin
[email protected] /home/username/projects/gutenpride
└─┬ @wordpress/[email protected]
  └── @wordpress/[email protected]
When you run lint:js, that is, the wp-scripts lint-js script, your code will be analyzed based on the rules defined in @wordpress/eslint-plugin.
You can also see that ESLint itself exists as a dependency.
$ npm ls eslint
[email protected] /home/username/projects/gutenpride
└─┬ @wordpress/[email protected]
  ├─┬ @wordpress/[email protected]
  │ ├─┬ @babel/[email protected]
  │ │ └── [email protected] deduped
  │ ├─┬ @typescript-eslint/[email protected]
  │ │ ├─┬ @typescript-eslint/[email protected]
  │ │ │ └── [email protected] deduped
  │ │ ├─┬ @typescript-eslint/[email protected]
  │ │ │ └── [email protected] deduped
  │ │ └── [email protected] deduped
  │ ├─┬ @typescript-eslint/[email protected]
  │ │ └── [email protected] deduped
  │ ├─┬ [email protected]
  │ │ └── [email protected] deduped
  │ ├─┬ [email protected]
  │ │ └── [email protected] deduped
  │ ├─┬ [email protected]
  │ │ ├─┬ @typescript-eslint/[email protected]
  │ │ │ └── [email protected] deduped
  │ │ └── [email protected] deduped
  │ ├─┬ [email protected]
  │ │ └── [email protected] deduped
  │ ├─┬ [email protected]
  │ │ └── [email protected] deduped
  │ ├─┬ [email protected]
  │ │ └── [email protected] deduped
  │ ├─┬ [email protected]
  │ │ └── [email protected] deduped
  │ ├─┬ [email protected]
  │ │ └── [email protected] deduped
  │ ├─┬ [email protected]
  │ │ └── [email protected] deduped
  │ └── [email protected] deduped
  └─┬ [email protected]
    └─┬ @eslint-community/[email protected]
      └── [email protected] deduped
Extend ESLint Rules
Of course, you can develop based only on these default rules. However, some developers may want to change some of the rules to suit their preferences or apply stricter rules.
To change or extend these default rules, create a file called .eslintrc in the root directory of your project and write the following code in it:
{
	"extends": [ "plugin:@wordpress/eslint-plugin/recommended" ]
}
When you run the lint:js script, your code will be analyzed based on the rules defined here.
Tweak Existing Rules
Try updating this file to change an existing rule.
For example, say you wrote the following code to use an API prefixed with __experimental.
Note: this is just an example; there is no library called @wordpress/foo and no API called __experimentalFeature.
import { __experimentalFeature } from '@wordpress/foo';

export default function Edit() {
	const myVariable = __(
		'Gutenpride – hello from the editor!',
		'gutenpride'
	);
	return <p { ...useBlockProps() }>{ myVariable }</p>;
}
When you run lint:js you will get the following two errors:

Of these two errors, pay attention to the error that says “Usage of __experimentalFeature from @wordpress/foo is not allowed.” This rule is defined by default in @wordpress/eslint-plugin, and you can find more information about the rule in this README.
To disable this rule for the entire project, change the .eslintrc file as follows:
{
	"extends": [ "plugin:@wordpress/eslint-plugin/recommended" ],
	"rules": {
		"@wordpress/no-unsafe-wp-apis": "off"
	}
}
If you run the lint:js script again, you should see that the errors related to APIs with the __experimental prefix disappear.
This rule is also disabled in the Gutenberg project.
Add New Rules
I would like to introduce some rules that I personally recommend to improve the code quality and security of block development. These rules are not included in the default rules of @wordpress/eslint-plugin, so you need to add them explicitly.
react/jsx-boolean-value
In React, enforces rules when the value of a prop is a boolean and true.
{
	"extends": [ "plugin:@wordpress/eslint-plugin/recommended" ],
	"rules": {
		"react/jsx-boolean-value": "error"
	}
}
✅ Do
const Hello = <Hello myProp />;❌ Don’t
const Hello = <Hello myProp={ true } />;@wordpress/i18n-text-domain
This forces you to add the correct text domain to your translation functions. Change the value of the allowedTextDomain field to suit your project.
{
	"extends": [ "plugin:@wordpress/eslint-plugin/recommended" ],
	"rules": {
		"@wordpress/i18n-text-domain": [
			"error",
			{
				"allowedTextDomain": "gutenpride"
			}
		]
	}
}
✅ Do
export default function Edit() {
	const myVariable = __(
		'Gutenpride – hello from the editor!',
		'gutenpride'
	);
	return <p { ...useBlockProps() }>{ myVariable }</p>;
}
❌ Don’t
export default function Edit() {
	const myVariable = __(
		'Gutenpride – hello from the editor!'
	);
	return <p { ...useBlockProps() }>{ myVariable }</p>;
}
@wordpress/dependency-group
When you import code from another source, it forces you to group them properly and add comments.
{
	"extends": [ "plugin:@wordpress/eslint-plugin/recommended" ],
	"rules": {
		"@wordpress/dependency-group": "error"
	}
}
✅ Do
/*
 * External dependencies
 */
import { camelCase } from 'change-case';

/*
 * WordPress dependencies
 */
import { Component } from 'react';

/*
 * Internal dependencies
 */
import edit from './edit';
❌ Don’t
import { camelCase } from 'change-case';
import { Component } from 'react';
import edit from './edit';
.eslintrc with the Rules Applied So Far
With all the changed and new rules applied to your .eslintrc, you should end up with something like this: Use this code as a guide to find the rules that best suit your project and preferences.
{
	"extends": [ "plugin:@wordpress/eslint-plugin/recommended" ],
	"rules": {
		"@wordpress/no-unsafe-wp-apis": "off",
		"react/jsx-boolean-value": "error",
		"@wordpress/i18n-text-domain": [
			"error",
			{
				"allowedTextDomain": "gutenpride"
			}
		],
		"@wordpress/dependency-group": "error"
	}
}
Detect Lint Rule Violations in the Code Editor
So far, we have fixed Lint errors and changed/added rules. But does that mean we need to run the lint:js or format script every time we update our code to detect and fix these errors?
Many code editors automatically read the ESLint rules in your project and detect them as errors in the code editor, or automatically fix code that violates the rules when you save the file.
Here, I’ll introduce the method I usually use in VSCode.
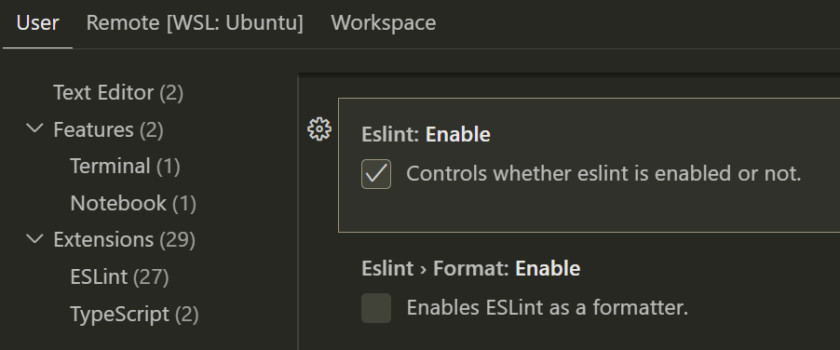
First, install the ESLint extension in VSCode and make sure ESLint is enabled in the user or workspace settings.

If the ESLint extension is enabled and you have code that violates a rule, you should see a warning like this:


Leave a Reply